

What Size Trampoline for a Small Yard Is Best?
July 24, 2026
In Ground Trampoline Excavation Requirements
July 26, 2026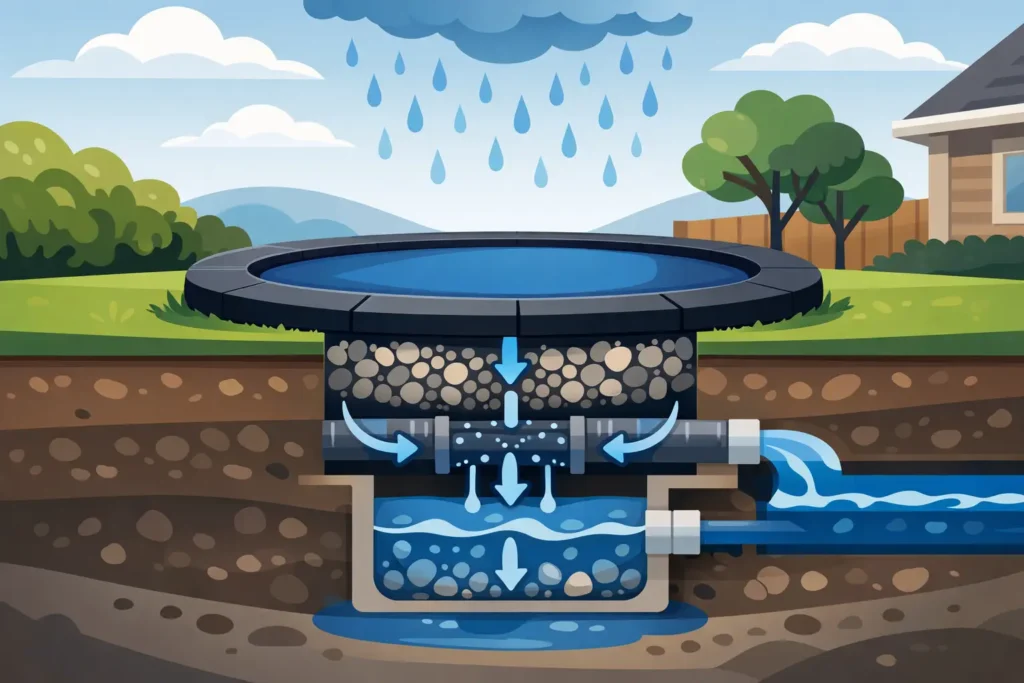
A great in-ground trampoline should sit beautifully in your backyard, not become a hidden collection point for rainwater. The right in ground trampoline drainage solutions protect the excavation beneath the trampoline, help preserve your galvanized frame, and keep the area more comfortable and safer for active family play after wet weather.
Drainage is not an accessory to figure out after installation. It is part of building an in-ground trampoline correctly. Before your family enjoys years of jumping, games, and outdoor exercise, take time to understand where water naturally travels across your yard and where it will go once the trampoline pit is in place.
Why drainage matters below an in-ground trampoline
An in-ground trampoline pit changes the way rainwater behaves in your yard. Water running downhill, draining from nearby landscaping, or flowing off a roof can collect in the lowest point of the excavation. If that water has nowhere to go, it can leave standing water under the mat, saturate the surrounding soil, and create ongoing maintenance problems.
Even premium equipment with rust-resistant galvanized steel benefits from a dry, well-planned installation area. Persistent moisture can shorten the life of surrounding materials, make the pit messy to service, and affect the stability of the soil around the trampoline system. More immediately, a wet jumping surface can be slippery. Children should never jump on a wet mat or use a trampoline when water is pooled below it.
A drainage plan also helps protect the polished, low-profile backyard look that makes an in-ground model so appealing. Rather than fighting mud, erosion, or water after every heavy storm, you can build a solution that works with your property from day one.
Start with your yard’s natural water flow
Before excavation begins, look at your yard after a steady rain. Notice whether water moves toward the planned trampoline location, settles in one area, or drains quickly into a lower portion of the property. A level-looking lawn is not always level enough to shed water efficiently.
The best location is generally on higher ground with room for surface water to flow away from the trampoline. Avoid installing directly below roof downspouts, at the bottom of a slope, or in a known low spot where puddles regularly form. If your dream trampoline location is the only practical place in the yard, drainage can still be designed around it. It simply may require more planning and a larger installation budget.
Soil matters, too. Sandy soil tends to drain more freely than heavy clay. Clay can hold water for a long time, which means a basic gravel layer alone may not be enough. If you are unsure about your soil or your yard has a history of flooding, ask an experienced local excavator, landscaper, or drainage professional to assess the site before the hole is dug.
Keep surface water out of the pit
The easiest water to manage is water that never enters the excavation. Grade the ground around the trampoline so it gently slopes away from the edge rather than funneling runoff toward it. Nearby garden beds, edging, patios, and lawn contours should all support that direction of flow.
Downspouts deserve special attention. A downspout that releases water near an in-ground trampoline can overwhelm an otherwise sound drainage system during a strong storm. Extend or redirect it so roof runoff discharges well away from the jumping area and follows a safe route across the property.
Do not create a raised rim that traps water around the trampoline. Your finished landscape should look intentional, but it also needs a path for rain to leave. A small grading adjustment made during installation is far easier than repairing a soggy yard later.
The most dependable in ground trampoline drainage solutions
For many residential installations, the most reliable approach combines a permeable base with a route for water to exit the pit. The specific design depends on your site, but these are the components installers commonly consider:
- A layer of clean drainage gravel at the bottom of the excavation helps water move downward instead of sitting on compacted soil.
- A permeable landscape fabric can help separate soil from gravel, reducing the chance that fine dirt clogs the drainage layer over time.
- Perforated drain pipe, often called a French drain, collects water and directs it away from the trampoline pit.
- A daylight outlet lets water flow naturally to a lower, approved area of the property when the yard has enough slope.
- A sump basin and pump may be needed where there is no practical gravity-drainage route or where groundwater is a recurring concern.
A gravel base is helpful, but it is not a complete drainage solution by itself. Water can move through gravel and then remain trapped underneath if the soil below drains slowly. That is why a pipe leading to a proper outlet is often the smarter long-term choice for yards with clay, slopes, or frequent heavy rain.
A gravity-fed outlet is usually the simplest option when your property allows it. It requires correct slope from the pit to the discharge point, so water naturally moves away without relying on electricity. The outlet location must be chosen carefully. It should not send water toward a neighbor’s yard, the house foundation, or a place that already struggles with drainage.
Where gravity drainage is not possible, a sump system can be effective. Water collects in a basin below the trampoline area and is pumped out when it reaches a set level. This approach adds equipment that needs occasional inspection, and it relies on power, so it is best planned with a professional who understands local conditions. In areas with intense storms or high water tables, a battery backup can be worth discussing.
Choose the right solution for your property
There is no single drainage setup that fits every backyard. A home with sandy soil and a naturally sloped lot may need only a well-built gravel base and a properly routed drain line. A flat yard with dense clay might need more extensive drainage, while a low-lying property may require a sump system and professional site planning.
The trampoline size also affects the project. A 10-foot round in-ground trampoline needs a smaller excavation than a 14-foot round model, while rectangular systems such as 10-foot by 6-foot and 11-foot by 8-foot designs create their own layout considerations. Bigger pits collect more water if drainage is overlooked, but the main question is not just trampoline size. It is how much water reaches the site and how efficiently the ground can move it away.
This is one reason premium in-ground trampoline systems are best treated as a complete backyard project, not simply a product placed in a hole. Your installer should work from the manufacturer’s excavation requirements while adapting the drainage plan to your specific yard.
Avoid shortcuts that create expensive problems
Do not install an in-ground trampoline in an unlined dirt hole and assume water will disappear on its own. That shortcut often leads to muddy conditions, blocked airflow beneath the mat, and a difficult cleanup job after storms. Likewise, do not route drainage pipe without confirming that it has enough slope and a safe discharge location.
Avoid filling the bottom of the pit with loose materials that can shift, clog, or interfere with the trampoline’s intended installation system. Follow the instructions for your specific model, including any required retaining wall, airflow, frame support, and clearance details. Premium trampoline components are designed to work together, and the excavation should support that design rather than compromise it.
Before digging, contact the appropriate utility-locating service and check local requirements for drainage discharge, electrical work, and excavation. If a sump pump is part of the plan, a qualified professional can help make sure the electrical setup is suitable for outdoor use.
Maintain your drainage system after installation
Once the trampoline is installed, drainage needs only simple attention, but it should not be ignored. After major rainstorms, check beneath the trampoline and around its perimeter for standing water, soft soil, erosion, or a new path of runoff. Clear leaves, mulch, and lawn debris from any visible drain outlet so water can continue moving freely.
Use a weather cover that is designed for your trampoline when conditions call for it, but remember that a cover does not replace drainage. Water can collect on top of an improperly fitted cover, so remove standing water before use and follow the cover’s care instructions. Regularly inspect the mat, enclosure, frame, and surrounding ground as part of your family’s normal safety routine.
A dry, well-built trampoline pit helps your investment look better and perform better season after season. When you are selecting a premium in-ground model, make drainage part of the conversation from the beginning. Lets Buy Trampolines can help you choose a size and system that fits your family’s backyard plans, while a qualified local installer can help ensure the ground beneath it is ready for years of confident, active fun.