
Trampoline Kit Versus Professional Installation
September 24, 2026
Which Trampoline Shape Saves Space in Your Yard?
September 28, 2026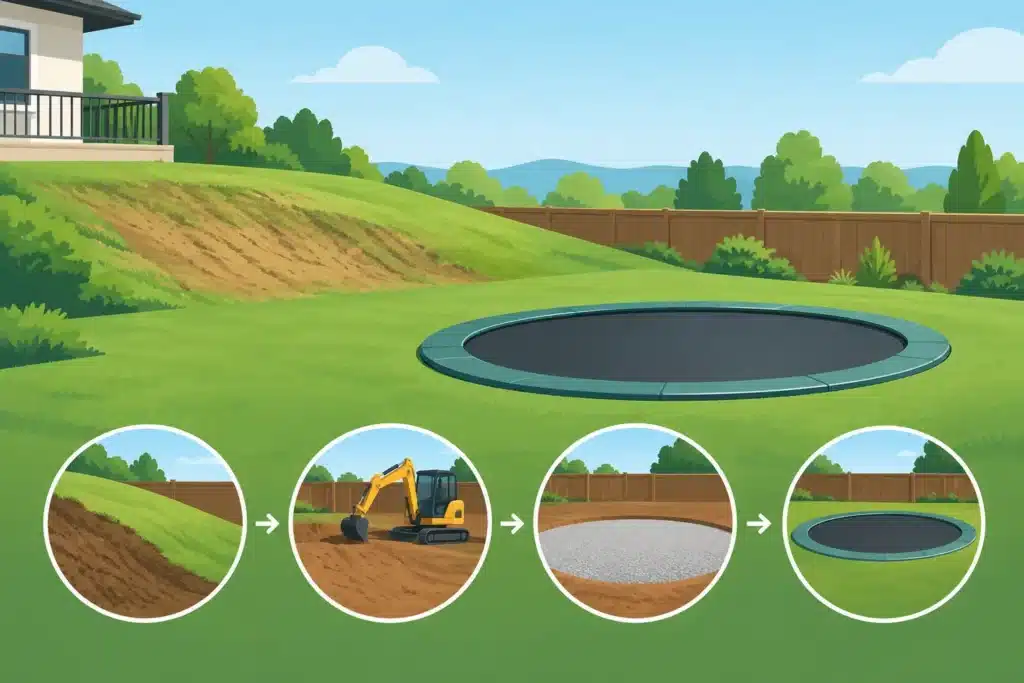
A hillside view may be beautiful, but it changes the way you plan an in-ground trampoline. Proper sloped yard preparation is not about forcing a trampoline into the lowest available spot. It is about creating a level, well-drained, stable play area where kids can jump confidently and your backyard still looks like it was designed for family life.
A modest slope does not automatically rule out an in-ground trampoline. Many homeowners install one successfully on a graded yard. The key is recognizing when the project needs more than standard excavation and planning the site before you choose a trampoline size, schedule delivery, or break ground.
Start With the Slope, Not the Trampoline
Walk the intended area after a hard rain. Notice where water travels, where it collects, and whether the ground feels soft underfoot. A gentle, consistent slope is usually easier to address than a yard with several dips, buried rock, loose fill, or runoff from a roof, driveway, or neighboring property.
For an in-ground trampoline, the finished jumping surface must be level. That does not mean every inch of the surrounding yard must be perfectly flat. It means the excavation, support area, and trampoline frame need a stable, level base. Installing a frame on an angle can affect the way it sits, the way the mat performs, and the overall safety of the jumping area.
Measure more than the visible footprint of the trampoline. Your installation area should also allow working room for excavation, drainage materials, safe access, and landscaping around the finished system. A 12-foot round trampoline, for example, needs more planning space than its diameter alone suggests. Rectangular models can be a smart fit for narrow yards, but they still need clear space around the perimeter.
Before settling on a location, call for utility marking and verify local rules for excavation, drainage changes, retaining structures, and fencing. This is especially important on a slope, where a small grading decision can change how water moves across the property.
Sloped Yard Preparation Begins With Drainage
Water is the issue that deserves the most attention. An in-ground trampoline pit is below the surrounding grade, so it must never become the easiest place for rainwater to collect. Standing water can create muddy conditions, damage the surrounding landscape, and add unnecessary wear to a premium backyard investment.
The right drainage approach depends on your soil and site conditions. Sandy soil may drain naturally, while dense clay can hold water long after a storm. A yard with a high water table or regular runoff may need a more deliberate drainage plan, such as a gravel drainage layer, perforated drainage pipe, a dry well, or a connection to an approved stormwater solution.
Do not direct water toward a neighbor’s property, your home’s foundation, or the trampoline opening. On a sloped yard, it is often wise to intercept uphill runoff before it reaches the installation area. A qualified excavation or landscape professional can assess where water is coming from and create a route that carries it away safely.
Keep the Pit Dry From the Bottom Up
A properly prepared pit typically needs a firm, drained bottom rather than loose soil that turns to mud. The exact excavation depth and base materials should follow the trampoline manufacturer’s installation requirements. This matters because premium in-ground systems are engineered to perform with correct airflow and support beneath the mat.
Do not assume a deeper hole solves a drainage concern. It can make the problem worse if water has nowhere to go. The goal is a stable excavation with a deliberate exit path for water, not simply more empty space below the frame.
Decide Whether to Cut, Fill, or Build a Terrace
Most sloped installations use one of three approaches: cutting into the uphill side, adding compacted fill to the downhill side, or creating a level terrace with a retaining solution. The best choice depends on the grade, soil stability, available space, and the amount of elevation change across the trampoline area.
Cutting into the slope can keep the finished trampoline low and integrated with the yard. However, it may require a retaining wall or reinforced edge on the uphill side. Fill can reduce excavation, but it must be properly compacted in layers. Loose fill may settle over time, which is not acceptable beneath or immediately around an in-ground trampoline.
A terraced area can create a polished, intentional backyard design. It also gives families a natural place for pathways, seating, planting beds, or a safety enclosure entrance. The trade-off is cost. Retaining walls, engineered drainage, and professional grading can add significantly to the installation budget, particularly on a steep or unstable site.
If the slope is substantial, if the installation is close to a property line or foundation, or if a retaining wall will hold back significant soil, bring in a licensed local professional. This is not the part of the project to guess at. A sound site plan protects your family, your yard, and the long-term performance of the trampoline.
Create a Level Zone Around the Frame
The trampoline itself may sit flush with the lawn, but the area around it should be planned as carefully as the pit. Kids will run toward the trampoline, step off it, and gather nearby between turns. A lumpy, tilted, or slick perimeter creates an avoidable trip hazard.
Aim for a level or gently graded landing area around the opening, while keeping surface water moving away from the trampoline. Sod is a popular choice because it creates a soft, natural look. Some families prefer mulch, pavers, or a compacted pathway leading to the entrance. Whatever you choose, avoid materials that can wash into the pit or create a hard edge near the jumping area.
Keep trees, rooflines, fences, playsets, and other obstacles in mind when selecting the final position. Overhanging branches drop leaves and debris, while nearby structures can limit safe access. A clear, open zone makes the trampoline feel like a purposeful backyard feature instead of a crowded afterthought.
Think About Access During Installation
Excavation equipment needs a route into the yard. On a sloped lot, that route may be as important as the final trampoline location. Consider gate widths, stairs, narrow side yards, irrigation lines, and whether a machine can reach the site without damaging landscaping.
If access is limited, your installer may need smaller equipment or more hand excavation. That can increase labor time, but it may be worthwhile to preserve a finished patio, mature trees, or carefully maintained garden beds. Discuss access early so there are no surprises after your trampoline arrives.
Match the Trampoline Size to the Usable Level Area
A larger trampoline creates more room for energetic play, but it should never force a poor site decision. If your yard has a broad, level terrace, a 12-foot or 14-foot round model may give a busy family plenty of jumping space. If the practical level area is long and narrow, a rectangular in-ground trampoline may use the space more efficiently.
Think about who will use it most. Younger children may be well served by a smaller footprint, while teenagers and active families often appreciate more room. Your decision should balance jump space with the clear area needed around the trampoline, room for a safety enclosure if selected, and the cost of grading a larger site.
At Lets Buy Trampolines, we encourage families to choose for the yard they can prepare correctly, not simply the biggest model they can fit on paper. A properly installed premium trampoline delivers safer play, a cleaner landscape look, and years of outdoor activity.
Plan for the Landscape After Excavation
Excavation changes more than the trampoline area. Removed soil has to go somewhere, and a sloped yard can make that material useful. Clean excavated soil may help shape a nearby planting bed or soften a transition between terrace levels, provided it does not interfere with drainage.
Finish the site with practical maintenance in mind. Choose plants that tolerate the local sun and moisture conditions, leave access to drainage cleanouts where applicable, and avoid aggressive roots near the excavation. Keep the area clear of loose rocks, edging pieces, and lawn equipment when children are using the trampoline.
Once the installation is complete, inspect the yard after the first few heavy rains. Watch how water behaves at the uphill edge, around the frame, and at the drainage outlet. A small adjustment to grading or landscaping is much easier to make early than after water has repeatedly found the wrong path.
A sloped backyard can become one of the best places for an in-ground trampoline when the grade, drainage, and access are planned before the fun begins. Give the site the attention it deserves, and you will create a level, attractive space where your family can make active memories for years to come.